11 COM Interface
One of the features of InventSim is a built-in Component Object Model (COM) interface for inter-process communication. This interface allows other, COM-compatible, processes to communicate with the InventSim software and control the application - i.e. access program data structures and execute procedures. With COM, you can easily connect other application to InventSim and automate the tasks executed within InventSim using commands and custom scripts. COM server is registered by default when installing the InventSim software by using GUID= ’EMIvent.InventSim.App’ (GUID is a unique number that COM uses to identify interface). Several programs support COM technology2, here are some examples: Matlab, GNU Octave, Labview, Python, Visual Basic Script (VBS).
The COM interface of InventSim gives you the options to:
-
• Create, Load, Save projects.
-
• Create, Modify variables.
-
• Create 2D and 3D primitives.
-
• Perform Boolean operations on objects.
-
• Define ports.
-
• Set simulation settings.
-
• Start the simulation and fetch the results.
The reference for the COM interface methods and its properties (API) is described in a separate documentation file ’COM_API_Doc.chm’, stored in InventSim installation folder.
11.1 An example: Connecting/scripting with Matlab\GNU Octave
To start the InventSim COM server from Matlab or GNU Octave, execute the command 3:
App = actxserver('EMInvent.InventSim.App');
The resulting Matlab variable App will be handled to the COM interface of InventSim.4 Using this handle gives you the access to the
fields and methods for objects defined in the COM interface. For example, you might write a simple Matlab script that loads the project file from a specified path on disk, performs the simulation and loads the scattering parameter
\(s_{11}\) into Matlab workspace:
App = actxserver('EMInvent.Simulator.App');
App.ShowWindow(1);
App.OpenProject('C:\h_plane\channel8.ispr');
App.StartSimulation();
while App.IsJobRunning==1
   pause(1);
end
s11 = App.ActiveProject.Simulation.GetResult(0, 1,1,1,1);
3 In GNU Octave, install and load the ’windows’ package first
4 If InventSim is already running, the result will be registered as a handle by the active InventSim window. If InventSim is not open, the InventSim process will be started in the background. To show the InventSim window, invoke App.ShowWindow(1);
11.2 Scripting using Python
To connect to the InventSim COM server from Python (Windows x64 only), the package comptypes needs to be installed5 in Python environment. The script below shows how InventSim COM engine
can be accessed from Python by using the comtypes module:
# IS_connect.py
# script connects to InventSim from Python
import comtypes.client as cc
import comtypes
from cc import CreateObject
App = CreateObject("EMInvent.InventSim.App")
The App is a handle for the instance of InventSim created in Python. You can interact with InventSim by using this handle.
5 To install it, use the default package manager and execute the following command: python -m pip install comtypes. Make sure that pip, setuptools, wheel packages are up to date with the python -m pip install --upgrade pip setuptools wheel command.
11.3 Scripting guide
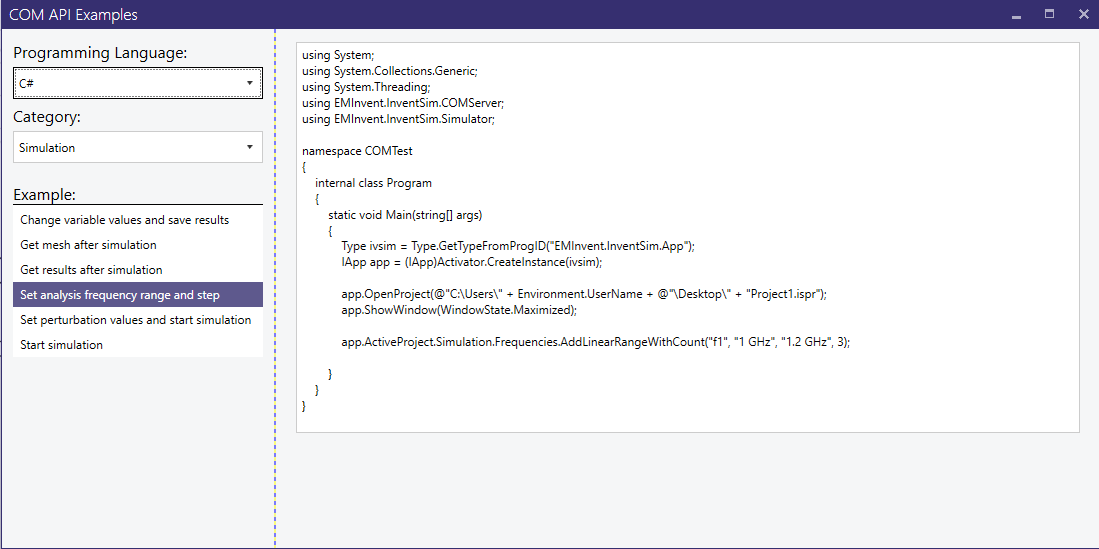
Several examples of COM scripting are shown in the dedicated COM API guide (Fig.11.1), accessible via the InventSim application from the menu ’Help -> COM API Examples’. The guide shows examples of invoking the COM functions from three environments: C#, Matlab, and Python.
11.4 Command line execution
The solver process can be run directly from the command line. The executable can be found in $InventSim_PATH\simulator\FEMCPP2.exe . To run the simulation, all of the input simulation files,
like mesh and solver options, have to be already generated with InventSim GUI. To re-run the simulation from command line, simply execute:
FEMCPP2.exe project_name
where project_ name is the core-name of all project files (with no file extension). The simulation should start. The results, like the scattering parameters file project_ name.sNp, will be saved in
the project folder.